
Pediatric BLS (Infants to Puberty) – Single and Two Rescuer Guidelines
Whether responding alone or with a partner, this comprehensive guide details step-by-step pediatric life support for infants through adolescents, covering scene safety, patient assessment, rescue breaths, CPR, AED use, and continuous care, ensuring effective intervention until advanced medical help arrives.
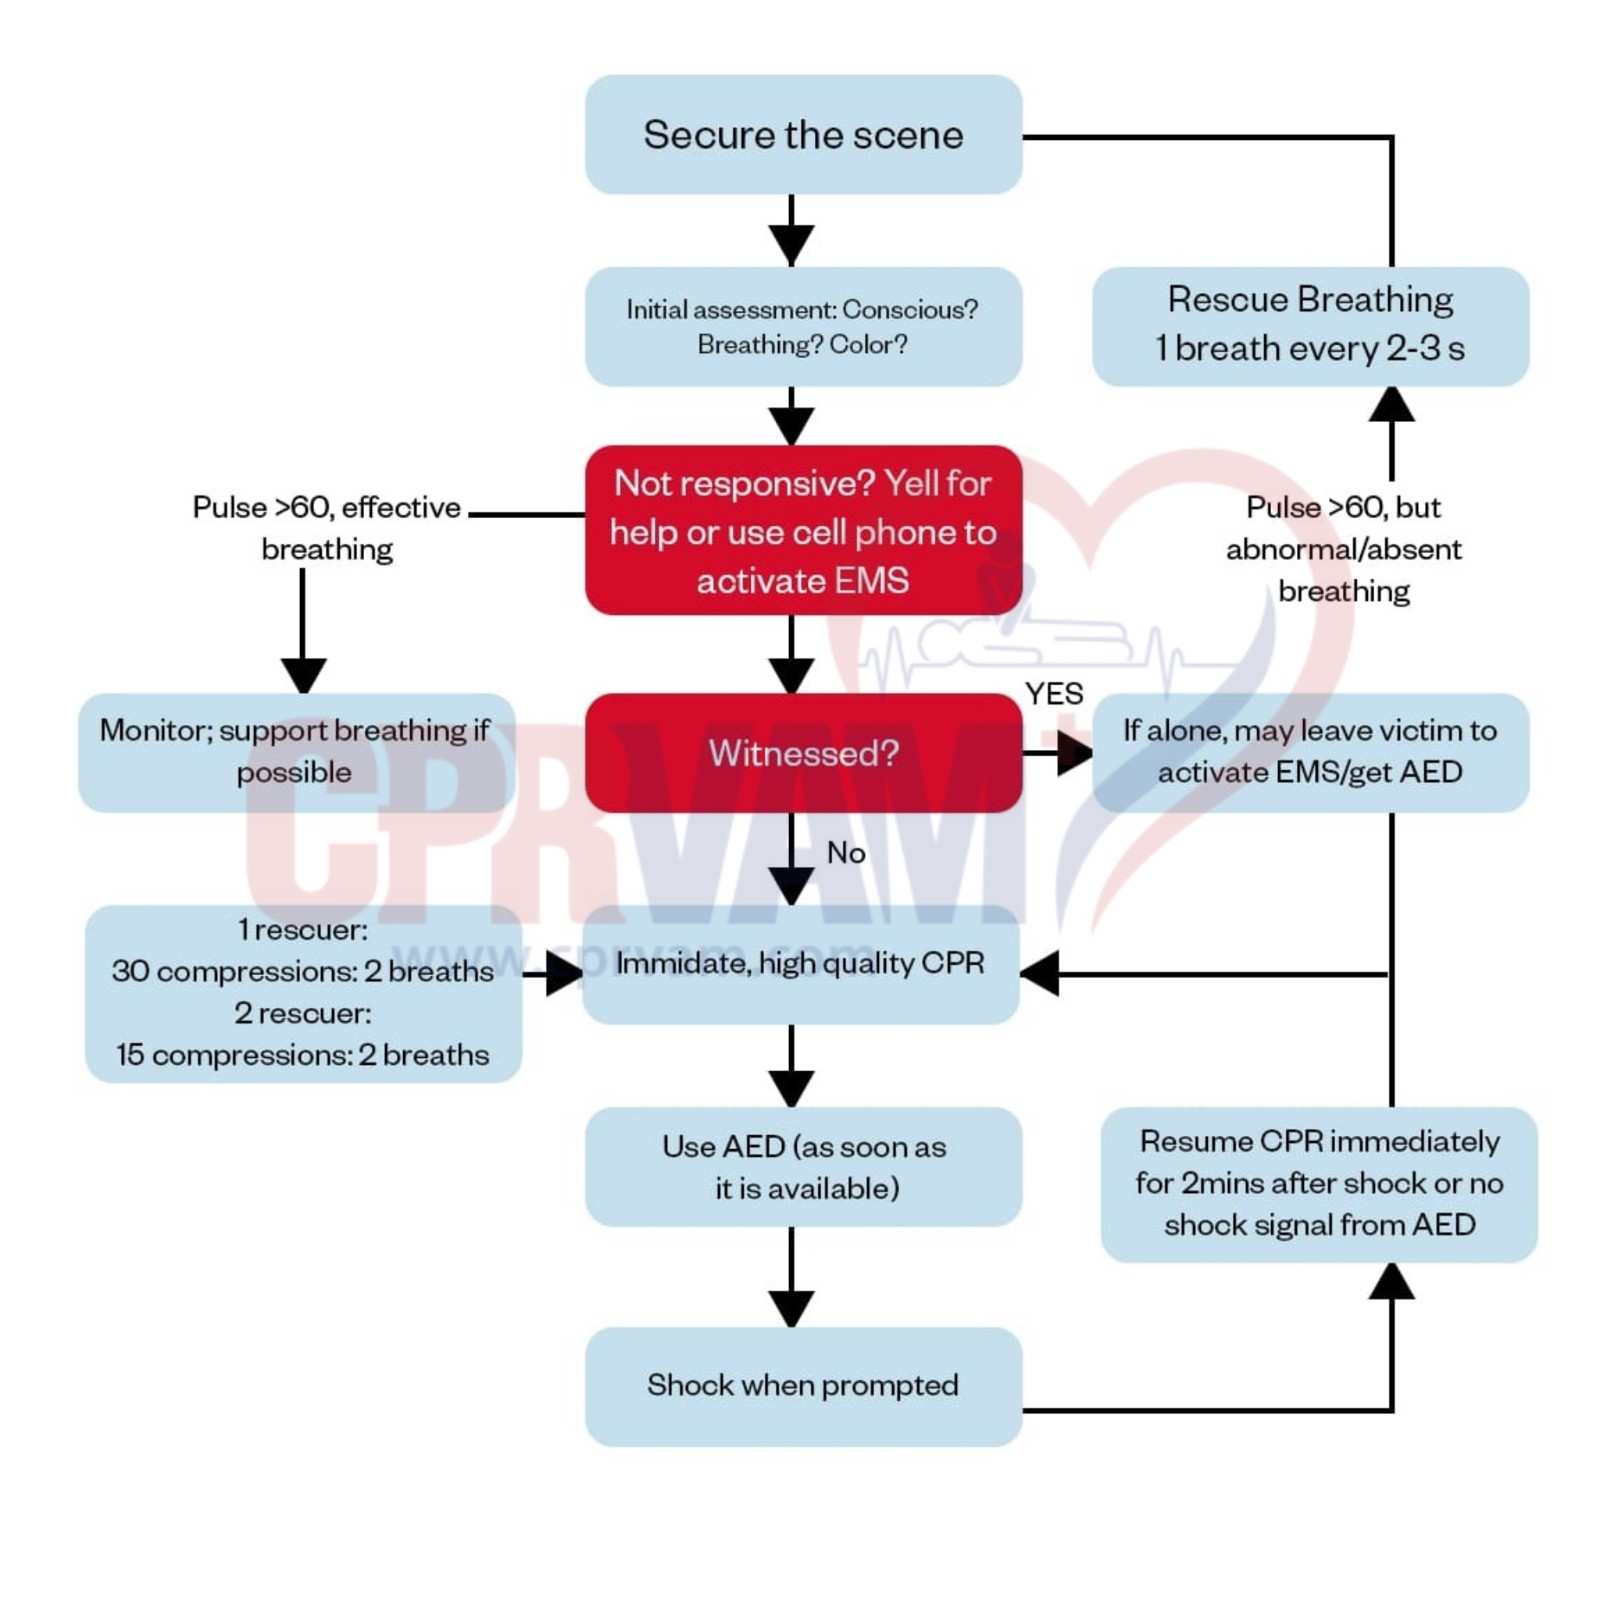
Below are the two approaches in the Pediatric BLS algorithm:
Single-Rescuer Pediatric BLS Algorithm
Pediatric BLS for a single rescuer focuses on quickly recognizing emergencies, activating help, and performing effective chest compressions and rescue breaths. This ensures the child receives immediate care with confidence.
Step 1: Ensure Scene Safety
Evaluate the environment for potential hazards, including fire, electrical sources, or other dangers.
Approach the patient only when the surroundings are secure.
Step 2: Check Responsiveness and Alert Help
Gently tap the child’s shoulders and call out to assess consciousness.
If there is no response, call for assistance and immediately contact emergency services.
Step 3: Evaluate Breathing and Circulation
Assess both breathing and pulse simultaneously, limiting the check to 10 seconds.
Identify whether breathing is normal, abnormal (gasping), or absent, and determine if a pulse is present.
Step 4: Support Adequate Breathing
If breathing is normal with a palpable pulse, maintain airway alignment and monitor continuously.
Observe respiratory effort and circulation while staying alert for any changes in condition.
Step 5: Deliver Rescue Breaths for Inadequate Breathing
Open the airway using a head-tilt–chin-lift maneuver.
Provide one breath every 2-3 seconds (20-30 per minute), ensuring a visible chest rise.
Reassess the pulse every 2 minutes and administer naloxone if an opioid overdose is suspected.
Step 6: Begin CPR if No Pulse or Heart Rate <60/min
Initiate chest compressions immediately.
For infants, use two fingers on the center of the chest; for older children, use the heel of one or both hands.
Apply a 30:2 compression-to-ventilation ratio, maintain correct depth and rate (100-120/min), allow full chest recoil, and minimize interruptions.
Step 7: Use an AED
Apply the AED promptly and follow device instructions carefully.
For witnessed collapses, apply the AED immediately; if alone and unwitnessed, perform 2 minutes of CPR before retrieving the AED.
Pause only for rhythm analysis and resume CPR immediately after delivering a shock for shockable rhythms.
Step 8: Maintain Resuscitation Until Help Arrives
Continue CPR, ventilation, and rhythm assessment until the child shows signs of life or advanced care arrives.
Maintain consistent technique and provide a structured handover to arriving professionals.
Two-Rescuer Pediatric BLS BLS Algorithm
When two or more rescuers work together, Pediatric BLS can be performed faster and more effectively. Team coordination ensures high-quality CPR, timely AED use, and improved chances of survival for the child.
Step 1: Verify Safety and Assign Roles
Ensure the environment is safe for both rescuers and the patient.
Assign tasks: one rescuer stays with the patient, the other retrieves the AED and prepares for compressions.
Step 2: Assess Responsiveness and Activate Support
Check responsiveness by tapping the child and calling out.
Summon additional help and assign the AED retrieval task to the second rescuer immediately.
Step 3: Simultaneous Breathing and Pulse Check
Evaluate breathing and pulse together within 10 seconds.
Classify as normal, abnormal with pulse, or absent to guide immediate intervention.
Step 4: Observe Stable Patients Continuously
For patients with adequate breathing and pulse, maintain the airway and monitor closely.
Be prepared to escalate care if signs of deterioration appear.
Step 5: Deliver Rescue Breaths for Inadequate Breathing
Open and position the airway effectively.
Give one breath every 2-3 seconds, ensuring chest rise is visible.
Reassess pulse every 2 minutes and administer opioid antagonists if indicated.
Step 6: Initiate CPR for Poor Perfusion or No Pulse
Begin compressions immediately.
For infants, compress using two fingers at the center of the chest; for older children, use the heel of one or both hands.
Start with 30:2 cycles, then switch to 15:2 once the second rescuer joins.
Ensure correct compression depth and rate, allow full chest recoil, and reduce interruptions.
Step 7: Apply AED and Evaluate Rhythm
Apply AED pads and follow prompts carefully.
Pause only for rhythm analysis, ensuring no one is touching the patient.
Deliver shock for shockable rhythms and resume CPR immediately.
Step 8: Manage Shockable vs Non-Shockable Rhythms
For shockable rhythms (VF or pulseless VT), give one shock and resume CPR for 2 minutes.
For non-shockable rhythms (Asystole or PEA), continue CPR uninterrupted for 2 minutes before reassessment.
Reassess rhythm every 2 minutes and coordinate rescuer switches to maintain high-quality compressions.
Step 9: Continue Resuscitation Until Recovery or Handover
Maintain cycles of CPR, ventilation, and rhythm checks until return of spontaneous circulation, movement, or advanced care takes over.
Ensure clear communication and structured handover between rescuers and healthcare professionals.