

Have you ever been in a situation where someone suddenly collapses and stops breathing? It is a frightening moment, especially if you are the only one there. In those critical seconds, knowing how to open the airway can make all the difference. You can provide life-saving breaths effectively, keeping oxygen flowing to the brain and heart until help arrives. Your actions matter more than you realize.
Imagine being the sole responder during a medical emergency. Every step you take, from checking for breathing to giving rescue breaths, counts toward survival. By understanding simple, proven techniques like the head tilt, chin lift, or jaw thrust, you can manage the airway confidently. You do not need to be a medical professional. Just the right knowledge and practice can save a life in your hands.
This blog guides single rescuers on opening the airway, providing rescue breaths, and following CPR steps safely, using proven techniques from the American Heart Association and Red Cross guidelines.
Why Is Proper Airway Management Vital When You Are the Only Rescuer?
When you are the only rescuer, managing the airway is critical. According to the American Heart Association (AHA, 2025), brain cells can begin to die within 4-6 minutes of oxygen deprivation. You must act quickly to open the airway, ensuring rescue breaths deliver oxygen to the lungs and vital organs, increasing survival chances until professional help arrives.
Key reasons why airway management matters:
- Ensures Oxygen Reaches the Lungs
You must keep the airway clear so your rescue breaths reach the lungs. Without airflow, oxygen cannot enter, making CPR ineffective and reducing the person’s chance of survival. - Protects the Brain and Heart
By opening the airway properly, you deliver oxygen to the brain and heart. You help prevent permanent damage and maintain vital organ function until professional care arrives. - Enhances CPR Effectiveness
Proper airway management ensures your chest compressions work efficiently. You improve oxygen delivery, allowing your efforts to circulate blood and maximize the chances of recovery for the person. - Supports Solo Rescuer Efficiency
When you know the right techniques, you can manage both airway and compressions confidently. You reduce stress and act systematically, making your response faster and more effective. - Follows CPR Guidelines Safely
Using recommended airway techniques keeps you aligned with American Heart Association guidelines. You reduce the risk of injury while delivering breaths safely, ensuring the best possible outcome.
What Are the Essential Steps to Take Before Opening an Airway as a Single Rescuer?
Before you open the airway, certain critical steps ensure both your safety and the victim’s. Following these steps helps you act quickly and effectively, giving the person the best chance of survival while minimizing risks.
Here are the essential steps to take before opening an airway as a single rescuer:
1. Check for Safety
Before approaching, make sure you are not putting yourself in danger. Look for hazards like traffic, fire, or electrical risks. Ensuring your safety allows you to assist confidently and effectively without becoming another victim.
2. Assess Responsiveness
Tap the person’s shoulder gently and ask, “Are you okay?” You need to quickly determine the responsiveness if they are conscious. This helps you decide whether to start CPR or wait for emergency assistance.
3. Call for Help
Immediately contact emergency services or call 911. If you are alone, use speakerphone so you can start airway management while waiting for help. You ensure professional responders are on their way without delay.
4. Check Breathing
Use the Look, Listen, and Feel method for no more than ten seconds. Observe chest movement, listen for air, and feel for breath on your cheek. You confirm whether rescue breaths are needed before proceeding.
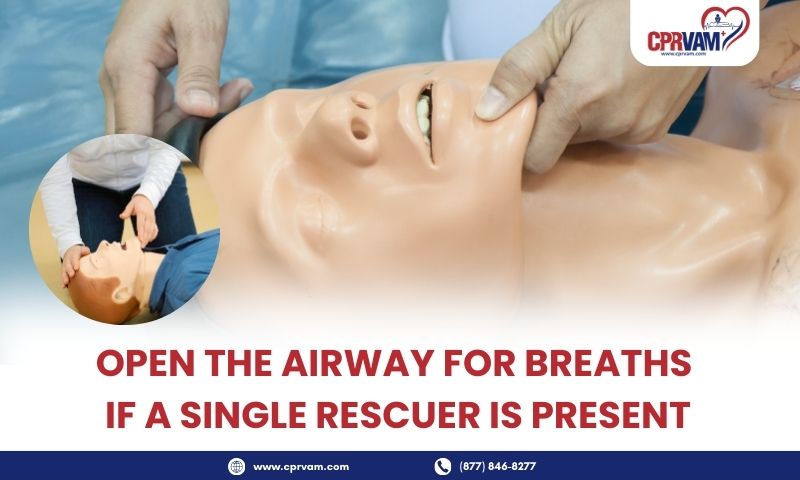
What Are the Most Effective Techniques to Open the Airway as a Single Rescuer?
Knowing the most effective techniques to open the airway as a single rescuer is essential. You must act quickly and safely to ensure oxygen reaches the lungs, especially if no one else is available to assist. Proper technique can save lives.
As a single rescuer, you can use two main techniques to open the airway:
1. Head-Tilt, Chin-Lift Technique
This technique is recommended when no spinal injury is suspected. You move the tongue away from the back of the throat, allowing air to pass freely. It is simple, fast, and widely taught by the American Heart Association.
Key Points
- Position the Victim
Lay them on a firm, flat surface on their back. - Place One Hand on the Forehead
Gently tilt the head backward without forcing it. - Lift the Chin
Use your fingertips under the bony part of the chin to lift upward. - Check the Mouth
Remove visible obstructions like food or vomit before giving breaths.
2. Jaw-Thrust Technique (Spinal Precaution)
This technique is used when a spinal or neck injury is suspected. According to the International Liaison Committee on Resuscitation (ILCOR), you can open the airway without tilting the head, protecting the cervical spine while allowing air to pass into the lungs.
Key Consideration
- Position Yourself
Kneel at the victim’s head to gain control. - Place Your Hands
Position fingers behind the angles of the lower jaw. - Lift the Jaw
Move the jaw forward without tilting the head. - Check for Obstructions
Ensure the mouth is clear of visible blockages before giving breaths.
How Do You Safely Clear the Airway Before Giving Rescue Breaths?
Clearing the airway is a crucial step before giving rescue breaths. Even with proper CPR technique, you must ensure the airway is free of obstructions to allow oxygen to reach the lungs effectively and safely.
Steps to Clear the Airway Before Giving Rescue Breaths:
- Look Inside the Mouth for Visible Objects
Always check the person’s mouth so you can remove anything blocking the airway before giving breaths. - Use a Finger Sweep Only If the Object is Visible
Only sweep your finger if you see an obstruction preventing you from pushing it deeper. - For Vomit or Fluids, Roll the Person to the Side and Clear the Mouth
Turn the person carefully to the side to remove fluids and keep the airway clear. - Ensure the Airway is Open Before Proceeding
Confirm the airway is unobstructed so you can give breaths safely and effectively.
How Do You Give Effective Rescue Breaths as a Single Rescuer?
Giving effective rescue breaths as a single rescuer is a crucial skill that ensures oxygen reaches the lungs when someone stops breathing. By following proper techniques, you can increase survival chances, avoid complications, and maintain CPR effectiveness even when you are alone.
Here are the steps to give rescue breaths when you are a single rescuer:
1. Seal the Mouth
To deliver effective breaths, you need to create a tight seal over the person’s mouth. For adults, pinch the nose and cover the mouth; for infants, cover both nose and mouth. This ensures the air you give goes efficiently into the lungs.
2. Deliver 2 Breaths
Once you have sealed the airway, deliver two slow breaths, each lasting about one second. Watch for the chest to rise as you breathe. You must keep a steady pace to avoid forcing air into the stomach and reduce effectiveness.
3 Observe Chest Rise
Always watch the chest rise after each breath. This shows you that the airway is open and the air you give is reaching the lungs. If the chest does not rise, you should adjust your technique to make your breaths safe and effective.
What Common Mistakes Do Single Rescuer Make During Rescue Breathing?
Performing rescue breathing on your own can be tough, and some mistakes can lower its effectiveness. As a lone rescuer, being aware of these errors helps you deliver safer, more effective care and boosts the person’s chances of survival.
Here are the common mistakes a single rescuer should avoid during CPR:
1. Avoid Over- or Under-Tilting the Head
If you tilt the patient’s head too far back or not enough, you may block the airway. You need to maintain the proper head position to ensure air flows freely into the lungs during rescue breaths.
2. Failing to Clear Obstructions
You must check the mouth for visible objects before giving breaths. If you skip this, food, vomit, or debris can prevent oxygen from reaching the lungs, making your rescue breaths ineffective and potentially harmful.
3. Improper Mouth Seal
Creating a proper seal is essential. If you do not cover the mouth tightly, air escapes instead of entering the lungs. Make sure your lips and hands seal correctly for both adults and infants to maximize ventilation efficiency.
4. Neglecting Compressions in Cardiac Arrest
While giving breaths, you cannot forget chest compressions. You must balance compressions and breaths according to guidelines. Skipping compressions reduces blood flow to vital organs, limiting your ability to sustain life until emergency help arrives.
What Special Considerations Should You Keep in Mind When Giving Rescue Breaths?
When giving rescue breaths, you need to consider special situations to ensure effectiveness and safety. According to the National Institutes of Health (NIH) MedlinePlus, factors such as age, body type, and the presence of fluids or vomit can affect how you open the airway and deliver breaths properly.
Special considerations during rescue breathing:
- Infants and Children
For infants and children, you should use a gentler head tilt while keeping the airway neutral. You must be extra careful to avoid overextending the neck, ensuring that your rescue breaths can flow safely into the lungs. - Obese Individuals or Pregnant Women
When helping obese individuals or pregnant women, you should adjust both the head tilt and compression technique. You need to adapt your approach so that your rescue breaths reach the lungs efficiently without causing harm. - Vomiting or Fluids
If the person has vomit or fluids, you should clear the airway before giving each breath. You must make sure that your rescue breaths are effective and not blocked, keeping oxygen flowing to the lungs safely.
Why Should Single Rescuers Master Airway Management During CPR?
Mastering airway management as a single rescuer is not just a skill that can be the difference between life and death. By understanding how to open the airway, give effective rescue breaths, and follow CPR guidelines, you empower yourself to act confidently in emergencies. With practice, you ensure that every breath you give reaches the lungs, maximizing the person’s survival chances until help arrives.
Take your lifesaving skills to the next level by enrolling in CPR training at CPR VAM, an AHA-certified training center. Our expert instructors provide hands-on training, guiding you step by step so you can confidently manage airways and deliver effective rescue breaths. Join us today and gain the skills to save lives when every second counts.
FAQs
1. How Can You Quickly Open the Airway If You’re Alone During an Emergency?
You can use the head-tilt, chin-lift if no spinal injury is suspected, or the jaw-thrust method if a neck injury is possible. These techniques let air flow safely to the lungs.
2. Why Do You Need to Clear the Airway Before Giving Rescue Breaths?
You must remove any visible objects so the breaths you give actually reach the lungs. Skipping this step can block oxygen and reduce survival chances.
3. How Many Rescue Breaths Should You Give As the Only Rescuer?
You should deliver two slow breaths, each about one second long. Watching the chest rise helps you know your breaths are effective.
4. What Mistakes Do You Commonly Make When Performing Rescue Breathing Alone?
You might tilt the head too far or not enough, miss clearing the airway, seal the mouth poorly, or forget compressions. Avoiding these mistakes makes your CPR safer and more effective.
5. How Should You Give Rescue Breaths to Infants or Children?
You should tilt their head gently and keep the airway neutral. This ensures your breaths flow safely without straining their delicate necks.


