
Ensuring your infant’s safety is a top priority for every parent and caregiver, especially in emergency situations like choking. Choking can happen quickly and unexpectedly, and knowing how to respond effectively can make the difference between a minor scare and a life-threatening situation. One of the most important first aid techniques for infants is Delivering Back Blows, a method recommended by the American Heart Association to safely clear an airway obstruction.
Back blows are designed to be gentle yet effective, combining proper positioning, controlled force, and gravity to dislodge an object without harming the infant’s delicate neck, spine, or ribs. When paired with chest thrusts, this technique forms a reliable and essential part of infant choking first aid. Understanding the correct way to hold your baby, maintain head and neck support, and execute these maneuvers correctly is crucial for both safety and effectiveness.
This blog will guide parents and caregivers through the proper way to hold an infant when giving back blows, including step-by-step instructions, safety tips, and expert recommendations. By mastering this technique, you can confidently respond to a choking emergency and protect your infant.
What Is a Back Blow?
A back blow is a first aid technique used to help a choking infant when an object is blocking their airway. It involves delivering a controlled strike between the infant’s shoulder blades to create enough force to dislodge the obstruction. This maneuver is recommended by organizations like the American Heart Association as part of the infant choking response.
Back blows are designed to work quickly and safely, using gravity and a gentle yet firm motion to clear the airway without harming the infant’s delicate neck and spine. When combined with chest thrusts, back blows form a core part of infant choking first aid, giving parents and caregivers a reliable method to respond in an emergency.
Why Does Position Matters?
The position of the infant during back blows is crucial for safety and effectiveness. Holding the baby incorrectly can increase the risk of injury, such as neck or spinal damage, and may make it harder to dislodge the object causing choking.
Proper positioning ensures that:
- Gravity helps the object move out of the airway.
- The infant’s head and neck are supported, preventing sudden movements.
- Back blows are directed effectively between the shoulder blades, maximizing the chance of clearing the airway.
- You can maintain a secure grip, reducing the risk of dropping the infant during the emergency.
In short, the right position makes back blows both safe and more likely to succeed, which is why every parent and caregiver should master this technique before an emergency arises.
How Should You Hold an Infant for Back Blows?
If your baby starts choking, the way you hold them really matters. Supporting their head, neck, and chest the right way can make back blows much more effective.
Here’s how you can position your little one safely and confidently:
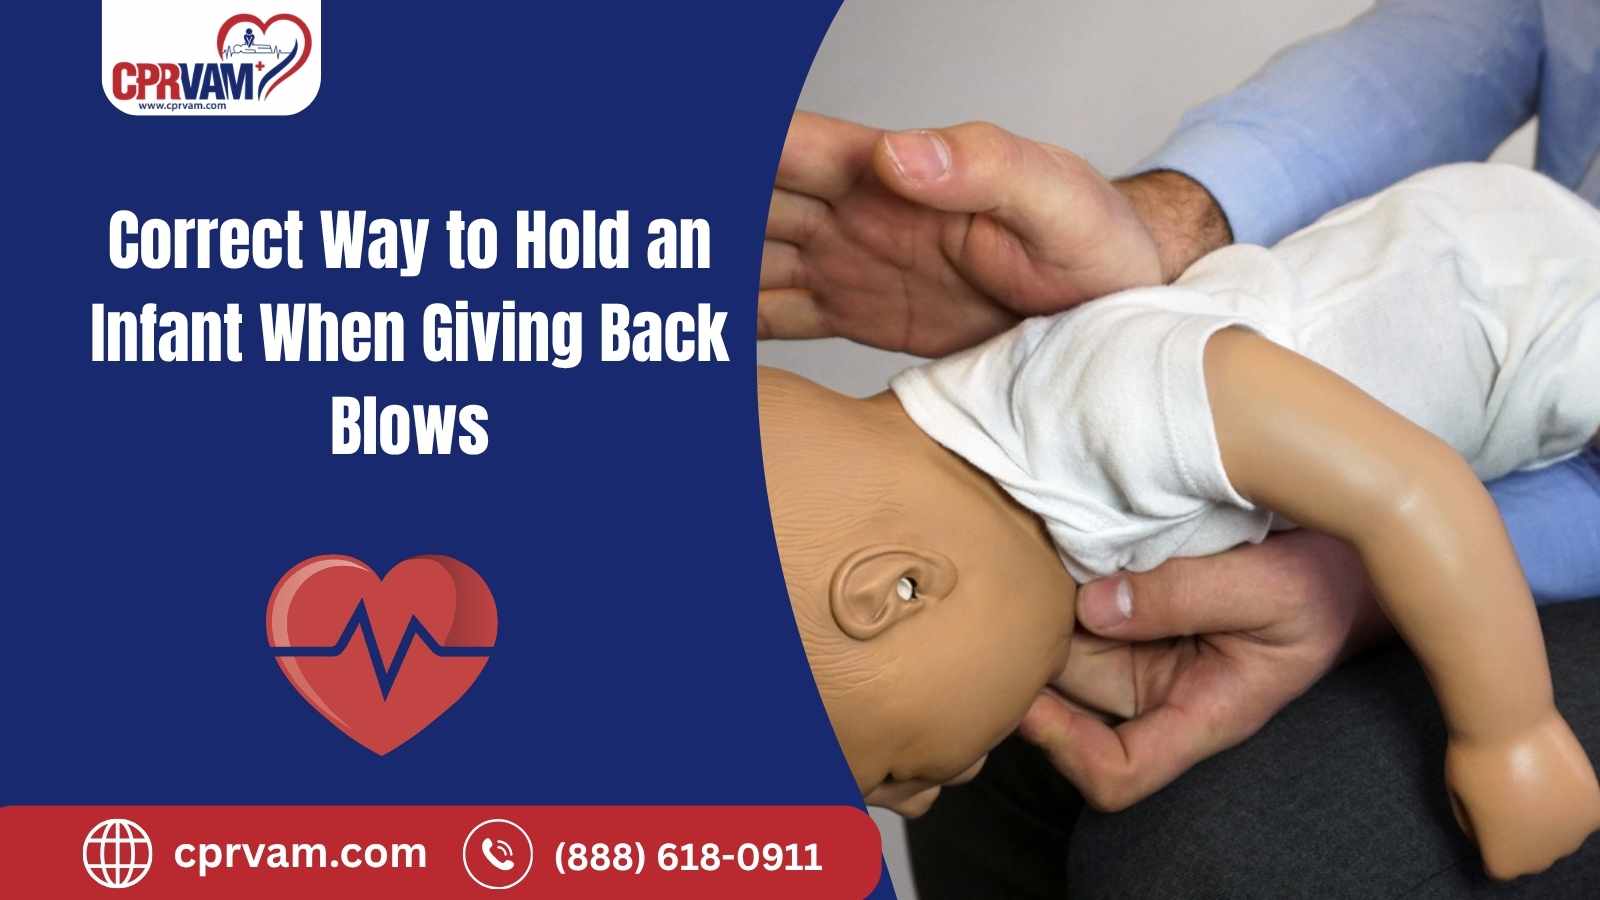
1. Position the Infant Face‑Down on Your Forearm
Once you’ve decided that the infant needs back blows, the next step is to position the infant correctly. Place the baby face down along your forearm, ensuring that their head, neck, and body are aligned.
Your forearm should rest on your thigh or lap for added stability, giving you better control. The infant’s chest should be supported against your forearm, allowing their body to rest securely while keeping them steady during back blows.
This position ensures that gravity can assist in dislodging the object, and it provides a safe, controlled posture that protects the infant from injury while you deliver the back blows.
2. Keep the Head Lower Than the Chest
A crucial part of giving effective back blows is to position the infant so their head is lower than their chest. This orientation uses gravity to help the object move upward and out of the airway, increasing the chances of clearing the obstruction quickly.
Make sure the infant’s head is supported and slightly tilted forward, never backward, to prevent choking or injury. Keeping the head lower than the chest ensures that each back blow is more effective and safe.
3. Support the Head and Neck
Supporting the infant’s head and neck is essential while giving back blows, because babies have very weak neck muscles and fragile spines. Use your hand to gently cradle the head, ensuring it stays aligned with the body and doesn’t flop to the side or backward. Your grip should be firm but gentle, giving you full control of the infant’s upper body while keeping them safe during each back blow.
This support prevents injury and helps you maintain a stable position, making every back blow more effective in dislodging the object.
4. Deliver Controlled Back Blows
Once the infant is securely positioned with their head supported and chest against your forearm, deliver back blows with care and precision. Use the heel of your hand to give firm but gentle strikes between the infant’s shoulder blades, aiming to create enough force to dislodge the object without causing injury.
Deliver up to five back blows, checking after each one to see if the object has been expelled. Always keep the blows controlled; too hard can harm the baby, and too soft may not be effective. After the blows, reassess the infant’s breathing and, if needed, alternate with chest thrusts until help arrives or the airway is clear.
Why Does This Position Work So Well?
The way you hold an infant during back blows isn’t arbitrary; it’s carefully designed to maximize safety and effectiveness. Proper positioning ensures that every back blow has the best chance of clearing the airway while minimizing the risk of injury.
Here’s why this position works so well:
1. Gravity Helps Move the Obstruction
- Keeping the infant’s head lower than the chest, gravity naturally assists in dislodging the object from the airway.
- This small tilt increases the likelihood that back blows will push the blockage upward and out, rather than deeper into the throat.
2. Head and Neck Are Fully Supported
- Babies have weak neck muscles and soft bones, making them vulnerable to injury.
- Cradling the head and aligning the neck with the spine protects the infant from sudden jolts during each back blow.
3. Controlled Force is Safe and Effective
- Resting the infant on your forearm and thigh stabilizes the body.
- This allows you to deliver firm but gentle blows between the shoulder blades, avoiding excessive force that could harm the ribs or internal organs.
4. Hands Are Free to React Quickly
- One hand supports the head and neck, while the other delivers back blows.
- This positioning ensures you can respond quickly if the obstruction doesn’t clear on the first attempt, switching to chest thrusts if needed.
5. Reduces the Risk of Dropping the Infant
- By keeping the baby securely against your forearm and thigh, you minimize the chance of slipping or losing grip during a stressful emergency.
In short: this position combines gravity, stability, and safety. It’s designed to protect the baby while giving parents or caregivers the best chance to clear a choking hazard quickly and effectively.
What Should You Do After Back Blows?
Once you’ve delivered the recommended back blows, it’s important to act quickly and carefully. How you respond immediately afterward can make a big difference in your infant’s safety.
Here are some of the things that you should do after giving back blows:
1. Check the Airway
- Look and Listen: Open the baby’s mouth carefully to see if the object has been dislodged.
- Only Remove Visible Objects: If you see the obstruction, use a finger sweep to gently remove it. Do not blindly insert your finger, as this can push the object deeper.
2. Assess Breathing and Response
- Observe the Infant: Are they crying, coughing, or breathing normally?
- Signs of Continued Choking: Weak or no cough, difficulty breathing, blue lips, or unresponsiveness indicate the airway is still blocked.
3. Switch to Chest Thrusts If Needed
- If the obstruction remains, alternate back blows with five gentle chest thrusts.
- Chest thrusts are performed with the infant on their back, using two fingers on the center of the chest just below the nipple line.
- Repeat the cycle of back blows and chest thrusts until the object is expelled or the infant becomes unresponsive.
4. Prepare for Emergency Response
- If you haven’t already, call emergency services (911 or local equivalent).
- Even if the object is cleared and the infant seems fine, medical evaluation is recommended to ensure no injury occurred.
5. Stay Calm and Monitor
- Keep your infant upright and calm, and continue observing breathing, skin color, and responsiveness.
- Provide reassurance with gentle holding and comforting words.
Key Tip: Back blows are effective, but every second counts. Remaining calm and methodical ensures that your actions are both safe and life-saving.
What Are the Important Safety Tips for Parents?
When it comes to helping a choking infant, safety is the top priority. Even in an emergency, following these tips can protect your baby while giving you confidence to act effectively.
Below are some of the most important safety tips that parents can follow:
1. Never Shake the Infant
- Shaking can cause serious injuries, including brain damage or spinal injury.
- Always support the head and neck gently while administering first aid.
2. Use Proper Force
- Back blows should be firm but gentle.
- Excessive force can fracture ribs or damage internal organs, while too little force may not dislodge the object.
3. Position Correctly
- Keep the infant head lower than the chest and fully supported along your forearm.
- Avoid holding the baby upright or letting the head hang backward.
4. Stay Calm and Focused
- Your calm demeanor helps your baby remain as relaxed as possible.
- Panic can cause mistakes or accidental injury, so take a deep breath before acting.
5. Learn and Practice First Aid
- Enroll in certified infant first aid and CPR courses through organizations like the American Heart Association.
- Practice positioning and back blows on a training mannequin to build confidence before an emergency occurs.
6. Be Prepared Ahead of Time
- Keep emergency numbers, like 911 or your local emergency service, readily accessible.
- Make sure all caregivers, grandparents, babysitters, and daycare staff know the proper technique.
7. Avoid Finger Sweeps Unless Object is Visible
- Only remove the obstruction if you can clearly see it.
- Blind finger sweeps can push the object deeper and make the situation worse.
Key Takeaway: Being prepared, calm, and knowledgeable reduces the risk of injury and increases the chances of successfully clearing a choking hazard. Safety comes first, even in urgent situations.
Master Infant Back Blows and First Aid Skills Today
Knowing the correct way to hold an infant when giving back blows is essential for every parent and caregiver, as proper technique can save a life while minimizing the risk of injury. Position the baby face down on your forearm with the head lower than the chest, supporting the head and neck to ensure safety. Once the infant is properly positioned, deliver controlled back blows and perform chest thrusts if needed. It is also important to stay calm, be prepared, and stay informed through first aid training and awareness of Infant Choking protocols. This knowledge empowers you to act confidently in a choking emergency, giving your infant the best possible chance of a safe outcome.
To ensure you are fully prepared, consider enrolling in professional first aid and CPR training with CPR VAM. As a trusted and authoritative provider, CPR VAM offers American Heart Association-approved ACLS, BLS, and PALS courses, equipping parents and caregivers with the skills and confidence to respond effectively in any emergency. Their expert-led training is designed for real-world situations, making it a reliable and credible way to build life-saving skills that could make all the difference for your infant’s safety.