



Performing Cardiopulmonary Resuscitation (CPR) on a baby (infant) involves giving chest compressions and rescue breaths to maintain blood circulation and oxygen delivery when an infant is unresponsive and not breathing normally. To perform infant CPR, place the baby on a firm, flat surface, activate emergency medical services (EMS), and begin chest compressions at a rate of 100 to 120 per minute. Compress the chest approximately 1.5 inches (4 cm), or one-third of its front-to-back diameter, and provide rescue breaths.
The recommended infant chest compression techniques are the two-thumb encircling-hands technique and the heel-of-one-hand technique. The compression-to-ventilation ratio is 30:2 for one rescuer and 15:2 for two rescuers. Infant CPR differs from adult CPR because babies require shallower compressions, different hand positioning, and age-appropriate airway management.
This blog explains how to perform infant CPR step by step, including the correct compression technique, breathing ratio, AED use, choking response, and important safety guidelines.
What Is Infant CPR?
Infant CPR (Cardiopulmonary Resuscitation) is an emergency first-aid technique specifically designed for babies under one year of age. It involves a combination of chest compressions and rescue breaths to support the baby’s heart and lungs during a life-threatening situation. The procedure is performed using gentle, age-appropriate techniques because an infant’s body is smaller and more delicate than an adult’s.
The main purpose of infant CPR is to maintain blood circulation and oxygen delivery to the brain and other vital organs when a baby experiences cardiac or respiratory arrest. Knowing how to perform this procedure is an important skill for parents, caregivers, childcare workers, and healthcare professionals, as a prompt response can help prevent serious complications and save a baby’s life.
When Should You Perform CPR on a Baby?
Perform CPR on a baby when the infant is unresponsive, is not breathing normally or is only gasping, and shows no signs of life. These symptoms indicate a possible cardiac arrest requiring immediate emergency intervention.
Common situations that can lead to infant cardiac arrest include:
Choking: A foreign object can block the airway, preventing oxygen from reaching the lungs.
Drowning: Submersion can interrupt normal breathing and cause severe oxygen deprivation.
Respiratory Failure: Serious breathing difficulties can prevent adequate oxygen delivery to vital organs.
Severe Infections: Conditions such as sepsis can cause serious respiratory and circulatory complications.
Cardiac Conditions: Congenital heart defects and abnormal heart rhythms can sometimes cause cardiac arrest.
Accidental Injuries: Severe trauma can compromise breathing and circulation.
How to Do CPR on a Baby: Step-by-Step Instructions
Performing CPR on a baby requires gentle chest compressions and rescue breaths to maintain blood circulation and oxygen delivery. If an infant younger than 1 year is unresponsive and not breathing normally or is only gasping, begin CPR immediately while arranging emergency medical assistance.
Follow these steps to perform infant CPR correctly:
Step 1: Check the Scene for Safety
Before approaching the baby, check the surrounding area for potential hazards, such as fire, electrical wires, traffic, or water. Make sure the environment is safe for both you and the infant.
If the area is unsafe, protect yourself and move the baby away from immediate danger when necessary.
Step 2: Check the Baby for Responsiveness
Gently tap the bottom of the baby’s feet and call their name to check for a response.
Look for signs such as:
- Movement of the arms or legs.
- Crying or other sounds.
- Any reaction to your voice or touch.
Never shake a baby to check for responsiveness because shaking can cause serious injuries. If the baby does not respond, shout for help and ask someone nearby to call emergency medical services.
Step 3: Check for Normal Breathing
Observe the baby’s chest and abdomen to determine whether the infant is breathing normally. Look for regular chest movement and listen for normal breathing sounds. Check for no longer than 10 seconds. If the baby is not breathing or is only gasping, treat the situation as cardiac arrest and begin CPR immediately.
Remember: Occasional gasping is not normal breathing and should not delay CPR.
Step 4: Activate Emergency Medical Services
Ask someone nearby to call emergency medical services and retrieve an automated external defibrillator (AED), if available. If you are alone and have a mobile phone, use the speaker function to contact emergency services while beginning CPR.
If you are alone without a phone, perform approximately 2 minutes of CPR before leaving the baby briefly to activate the emergency response system and retrieve an AED, if available.
Step 5: Position the Baby Correctly
Place the baby on their back on a firm, flat surface, such as the floor or a CPR training mat. Remember to position yourself beside the baby’s chest so you can perform compressions comfortably. Keep the baby’s head in a neutral position. Avoid tilting the head too far backward because excessive head extension can obstruct an infant’s airway.
Step 6: Perform 30 Chest Compressions
Chest compressions help circulate blood to the brain and other vital organs when the baby’s heart cannot pump effectively.
The 2025 AHA guidelines recommend two infant chest compression techniques: the two-thumb encircling-hands technique and the heel-of-one-hand technique.
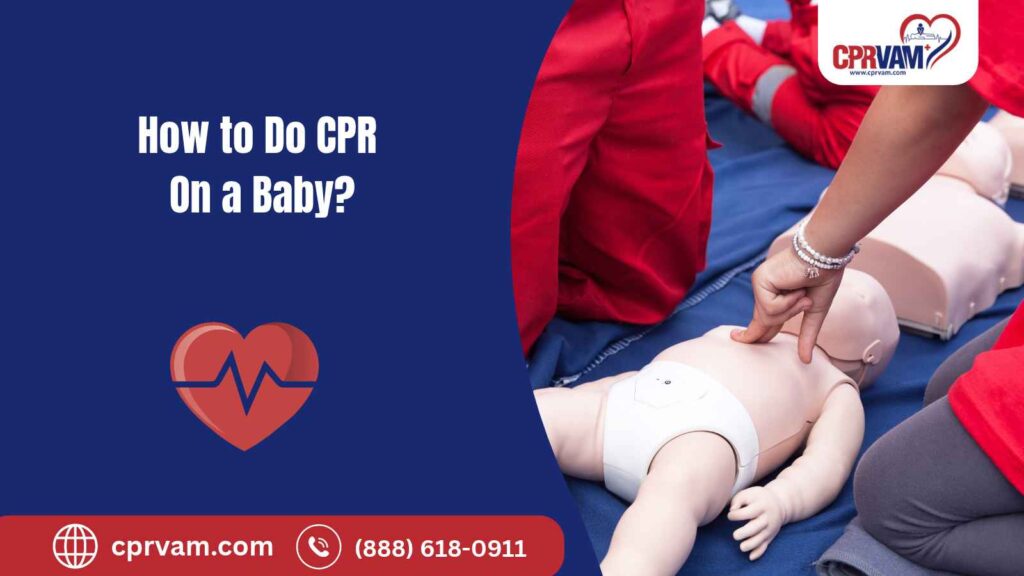
6.1. Two-Thumb Encircling-Hands Technique
- Place both thumbs side by side over the lower half of the baby’s breastbone (sternum).
- Wrap your fingers around the baby’s chest to support the back.
- Press down with both thumbs to compress the chest approximately 1.5 inches (4 cm).
- Release the pressure completely after each compression to allow the chest to return to its normal position.
- Repeat at a rate of 100 to 120 compressions per minute.
6.2. Heel-of-One-Hand Technique
- Place the heel of one hand over the lower half of the baby’s breastbone.
- Keep your fingers lifted away from the chest.
- Press down approximately 1.5 inches (4 cm), or one-third of the chest’s front-to-back diameter.
- Allow complete chest recoil after each compression.
- Maintain a compression rate of 100 to 120 per minute.
Choose the technique that allows you to achieve adequate compression depth and quality. The heel-of-one-hand technique is useful when you cannot comfortably encircle the baby’s chest.
Important: The traditional two-finger technique is no longer recommended in the 2025 AHA infant CPR guidelines because it does not consistently achieve adequate compression depth.
Step 7: Give 2 Rescue Breaths
After completing 30 chest compressions, provide 2 rescue breaths to deliver oxygen to the baby’s lungs.
Follow these instructions:
- Open the baby’s airway using the head-tilt/chin-lift technique.
- Keep the head in a neutral position rather than tilting it too far backward.
- Place your mouth over the baby’s mouth and nose to create a gentle seal.
- Give one gentle breath lasting approximately 1 second.
- Watch for the baby’s chest to rise.
- Allow the chest to fall before providing the second breath.
Each breath should be just strong enough to produce visible chest movement. Avoid blowing too forcefully or giving excessive air because this can cause stomach inflation and interfere with effective CPR. If the first breath does not make the chest rise, reposition the baby’s head and improve your seal before attempting the second breath.
Step 8: Continue CPR Until Help Arrives
Continue repeating cycles of 30 chest compressions and 2 rescue breaths. Maintain the recommended compression rate and depth while allowing complete chest recoil after every compression.
Continue CPR until:
- The baby shows clear signs of life and begins breathing normally.
- Emergency medical professionals arrive and take over.
- Another trained rescuer replaces you.
- You become physically unable to continue.
- The scene becomes unsafe.
Minimize interruptions in chest compressions and keep pauses shorter than 10 seconds whenever possible.
What Are the Important Guidelines for Performing Infant CPR?
Following the correct infant CPR guidelines helps rescuers deliver effective chest compressions and rescue breaths without applying excessive force. Compression depth, rate, hand placement, ventilation, and compression-to-ventilation ratio are essential components of high-quality infant CPR.
The following table summarizes the important infant CPR guidelines:
CPR Component | Recommended Guideline |
Age group | Younger than 1 year |
Compression rate | 100–120 per minute |
Compression Depth | Approximately 1.5 inches (4 cm) |
Compression Location | Lower half of the sternum |
Recommended Techniques | Two-thumb encircling hands or heel-of-one-hand |
Single-Rescuer Ratio | 30 compressions to 2 breaths |
Two-Rescuer Pediatric BLS Ratio | 15 compressions to 2 breaths |
Rescue Breath Duration | Approximately 1 second per breath |
Chest Recoil | Allow complete recoil after every compression |
CPR Interruptions | Keep pauses shorter than 10 seconds |
What to Do After Infant CPR?
After infant CPR, the next steps depend on whether the baby has regained normal breathing and signs of life. Even if the baby starts breathing normally, they need immediate medical evaluation because the underlying cause of cardiac arrest may still require treatment.
Follow these steps after CPR:
Check for Normal Breathing
If the baby shows signs of life, observe their chest movement and breathing. Do not mistake occasional gasping for normal breathing.Stop Compressions When Appropriate
If the baby begins breathing normally and shows signs of life, stop chest compressions.Maintain an Open Airway
Keep the baby’s head in a neutral position and ensure the airway remains clear.Monitor the Baby’s Condition
Watch for changes in breathing, responsiveness, skin color, or other signs of deterioration.Keep the Baby Warm
Cover the infant with a light blanket while avoiding overheating.Follow Emergency Medical Instructions
Continue monitoring the baby and follow the emergency dispatcher’s or medical professionals’ directions.
What Is the Difference Between Infant and Adult CPR?
Infant CPR differs from adult CPR in compression depth, hand positioning, and the compression-to-ventilation ratio used by two rescuers. These differences reflect the smaller chest size, developing anatomy, and different causes of cardiac arrest in infants.
Here is a comparison table of infant and adult CPR:
CPR component | Infant CPR | Adult CPR |
Age Group | Younger than 1 year | Adult |
Compression Rate | 100–120/min | 100–120/min |
Compression Depth | Approximately 1.5 inches (4 cm) | At least 2 inches (5 cm) |
Compression Technique | Two-thumb encircling hands or heel of one hand | Two hands |
Compression Location | Lower half of sternum | Lower half of sternum |
One-Rescuer Ratio | 30:2 | 30:2 |
Two-Rescuer Ratio | 15:2 | 30:2 |
Rescue Breaths | Cover mouth and nose | Mouth-to-mouth |
AED Pads | Pediatric pads when available | Adult pads |
The primary difference is that infant CPR requires gentler compressions and a technique adapted to the baby’s smaller chest. Additionally, two trained rescuers use a 15:2 compression-to-ventilation ratio for infants, compared with 30:2 for adults.
What Are Common Mistakes to Avoid During Infant CPR?
Performing CPR on a baby requires careful attention to compression technique, hand placement, airway positioning, and rescue breathing. Certain mistakes can reduce CPR effectiveness and interfere with blood circulation.
Here are common mistakes to avoid during infant CPR:
Using the Wrong Compression Technique
Use the two-thumb encircling-hands or heel-of-one-hand technique instead of the outdated two-finger technique.Incorrect Hand Placement
Place compressions over the lower half of the sternum rather than the upper chest or abdomen.Applying Excessive Force
Compress the chest approximately 1.5 inches (4 cm), avoiding excessive depth.Compressing Too Slowly or Too Quickly
Maintain the recommended rate of 100 to 120 compressions per minute.Not Allowing Complete Chest Recoil
Release pressure after each compression so the chest returns to its normal position.Giving Excessive Rescue Breaths
Provide gentle breaths lasting approximately 1 second, just enough to make the chest rise.Tilting the Baby’s Head Too far Backward
Maintain a neutral head position to avoid obstructing the airway.Delaying CPR
Do not waste time checking for a pulse if you are a lay rescuer. Begin CPR when the baby is unresponsive and not breathing normally.Taking Long Breaks Between Compressions
Minimize interruptions and keep pauses shorter than 10 seconds whenever possible.Using Adult CPR Techniques on a Baby
Adjust compression depth, hand placement, and rescue breathing to the infant’s size and age.
Can You Perform CPR on a Baby Who Is Choking?
If a baby has a severe airway obstruction and cannot cry, cough effectively, or breathe, perform cycles of 5 back blows followed by 5 chest thrusts.
Follow these steps:
- Support the baby’s head and neck while positioning the baby face down along your forearm.
- Keep the baby’s head lower than the chest.
- Deliver 5 firm back blows between the shoulder blades using the heel of your hand.
- Turn the baby face up while supporting the head and neck.
- Deliver 5 chest thrusts using two fingers over the lower half of the sternum.
- Repeat 5 back blows and 5 chest thrusts until the object comes out or the baby becomes unresponsive.
Never perform abdominal thrusts on an infant because they can cause serious internal injuries.
What to Do When a Choking Baby Becomes Unresponsive
If the baby becomes unresponsive:
- Carefully place the baby on a firm, flat surface.
- Shout for help and activate emergency medical services.
- Begin CPR, starting with chest compressions.
- Before providing rescue breaths, open the airway and look for a visible object.
- Remove the object only if you can clearly see it and safely reach it.
- Give 2 rescue breaths and continue CPR.
Never perform blind finger sweeps because pushing an object deeper into the airway can make the obstruction worse.
Why Is Infant CPR Training Important?
Infant CPR training teaches parents, caregivers, childcare professionals, and healthcare workers how to respond to life-threatening emergencies involving babies. Learning proper chest compression techniques, rescue breathing, choking relief, and AED use helps rescuers respond more confidently and effectively.
The importance of infant CPR training includes:
Early Emergency Response
Training helps individuals recognize cardiac arrest and begin CPR without unnecessary delays.Correct Compression Technique
Participants learn appropriate hand positioning, compression depth, rate, and chest recoil.Rescue Breathing Skills
Training teaches how to provide effective rescue breaths while maintaining an open airway.Choking Emergency Management
Participants learn the correct sequence of back blows and chest thrusts for a severely choking infant.AED Familiarity
Training explains how to operate an AED and select appropriate pediatric accessories.Improved Emergency Preparedness
Parents and caregivers develop practical skills to respond to infant medical emergencies.
Learn Infant CPR Through Hands-On Training
Knowing how to perform CPR on a baby can help parents, caregivers, and healthcare professionals respond quickly during a life-threatening emergency. Infant CPR combines age-appropriate chest compressions and rescue breaths to maintain blood circulation and oxygen delivery until medical help arrives. Learning the correct compression technique, depth, rate, choking response, and AED use through hands-on infant CPR training helps build the practical skills and confidence needed to handle emergencies and potentially save a baby’s life.
CPR VAM provides American Heart Association (AHA) BLS, ACLS, and PALS courses to help healthcare professionals develop essential lifesaving skills. For those who want specialized training in pediatric emergencies, the PALS course is particularly relevant because it covers the assessment and management of critically ill infants and children. Explore CPR VAM’s PALS, BLS, and ACLS training options to strengthen your emergency response skills and prepare for critical situations.
FAQs About Infant CPR
1. How Many Compressions Should You Give a Baby During CPR?
For one-rescuer infant CPR, give 30 chest compressions followed by 2 rescue breaths. For two-rescuer infant CPR, give 15 compressions followed by 2 rescue breaths. Maintain a compression rate of 100 to 120 per minute.
2. How Deep Should You Compress a Baby's Chest During CPR?
Compress a baby’s chest approximately 1.5 inches (4 cm), or one-third of the chest’s front-to-back diameter. Allow the chest to recoil completely after each compression.
3. Can You Perform CPR on a Baby With Two Fingers?
The 2025 AHA guidelines no longer recommend the traditional two-finger technique for infant chest compressions. Instead, use the two-thumb encircling-hands technique or the heel of one hand to achieve adequate compression depth.
4. How Many Breaths Do You Give a Baby During CPR?
Give 2 rescue breaths after every 30 compressions when performing CPR alone, or after every 15 compressions when two trained rescuers are performing CPR. Each breath should last approximately 1 second and produce visible chest rise.
5. Can You Perform CPR on a Baby Without Giving Rescue Breaths?
Yes. If you are unable or unwilling to provide rescue breaths, compression-only CPR is preferable to doing nothing. However, conventional CPR with both chest compressions and rescue breaths is recommended for infants because cardiac arrest in babies frequently involves respiratory problems.
6. Should You Check a Baby's Pulse Before Starting CPR?
Lay rescuers should not delay CPR by checking an infant’s pulse. If the baby is unresponsive, is not breathing normally, and shows no signs of life, begin CPR immediately. Healthcare professionals may check for a pulse for no more than 10 seconds.
7. When Should You Stop Performing CPR on a Baby?
Continue CPR until the baby shows signs of life and normal breathing, emergency medical professionals take over, the environment becomes unsafe, or you are physically unable to continue.
8. Is Infant CPR Different From Newborn Resuscitation?
Yes. Infant CPR generally follows pediatric basic life support guidelines for babies younger than 1 year. Newborn resuscitation immediately after birth follows specialized neonatal resuscitation protocols, including a different compression-to-ventilation ratio of 3:1 when chest compressions are required.